 Tweet
Tweet
Hi,
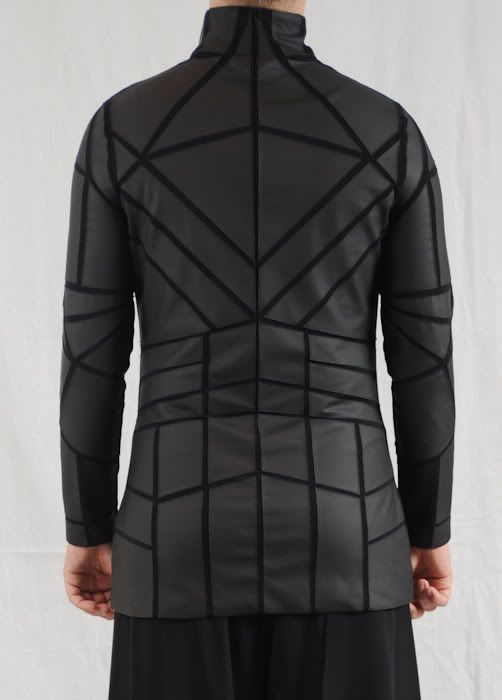
you already have seen the Gareth Pugh jacket that I did a few weeks ago. Although the result was great, I noticed that the materials I used were a bit too thick, so it turned out that the jacket was too warm when wearing it at a club. In addition, Heirloom had commented that the basic fit wasn't perfect, due to some puckering at the back and the sleeve being too wide at the top and too narrow at the fore arms -- I wholeheartedly agree to what he said. Problem was that I didn't use the Neoprene material for creating the pattern, and didn't know exactly how it would behave later, so I might have been too cautious, making things wider as they needed to be.
Apart from that, I used a leather/Neoprene combination, whereas Gareth had used jersey/PVC for his designs.
Fast forward a couple of weeks: While browsing a fabric online store, I stumbled upon a PVC/rubber material that matches the material Gareth used. 0,5 mm thickness - less than half of the leather I had used before. Absolutely matte (no reflection at all), black, with a textile back.

Hmm... should I order it? After all, I had done it before, so I could do it again, right?
All again, but yet different
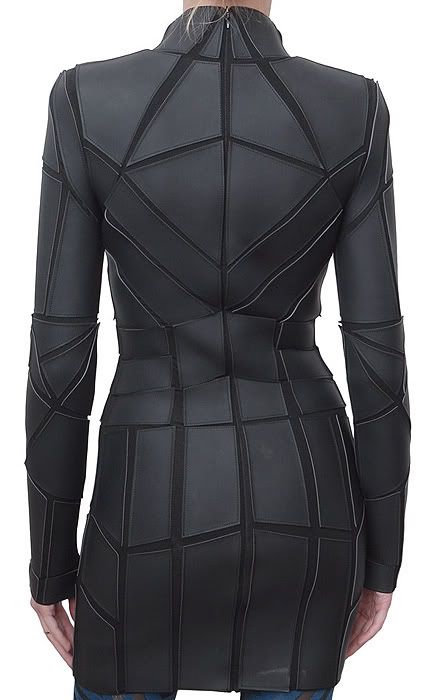
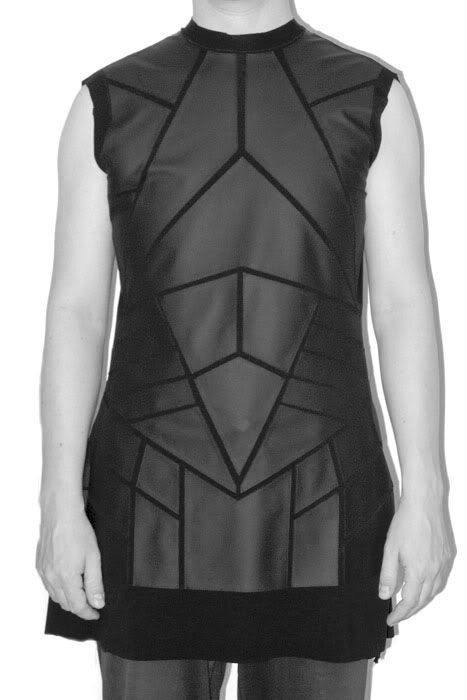
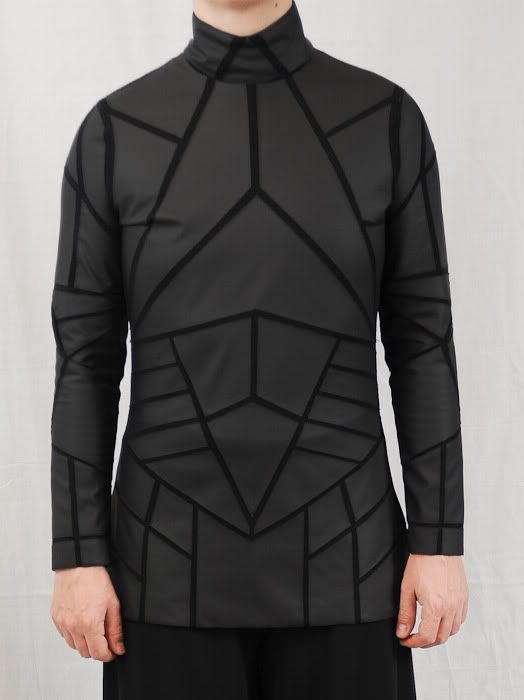
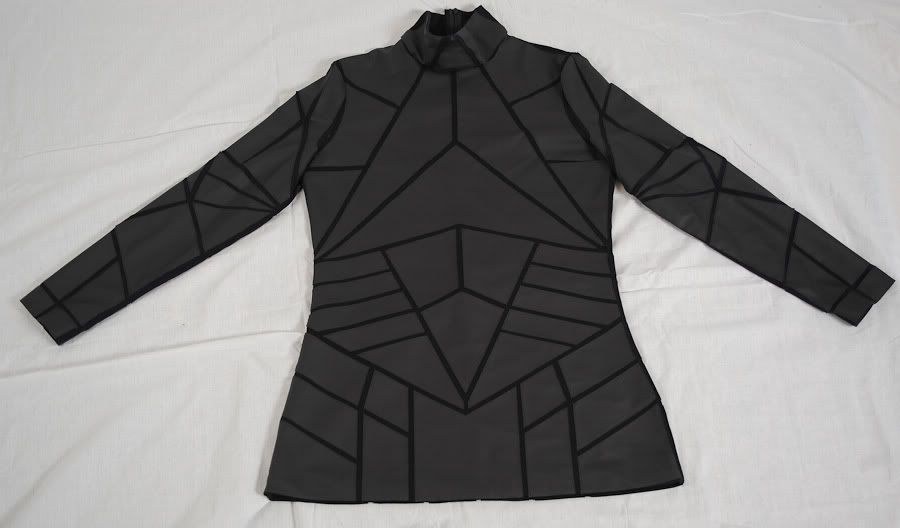
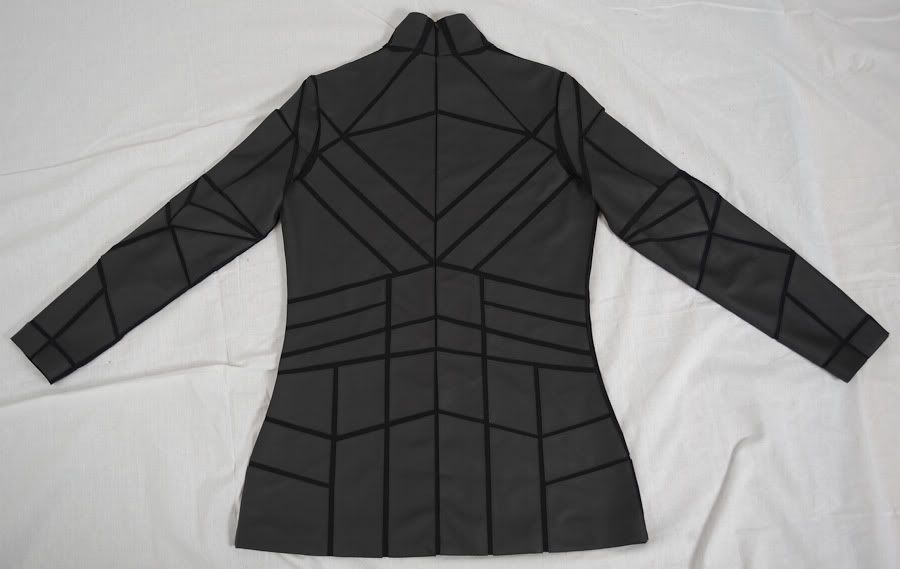
Should I just redo the jacket with the zipper in front? Having two versions of the same basic design didn't appeal to me. That's why I decided to take the dress of his collection and shorten it a bit, so it would be more of a "long-shirt". There is also a version available with long sleeves, which I unfortunately didn't find a photo of, so I am posting the short-sleeved version here:
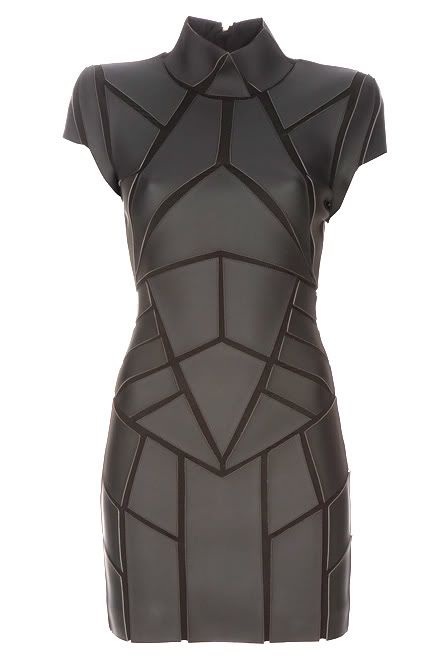
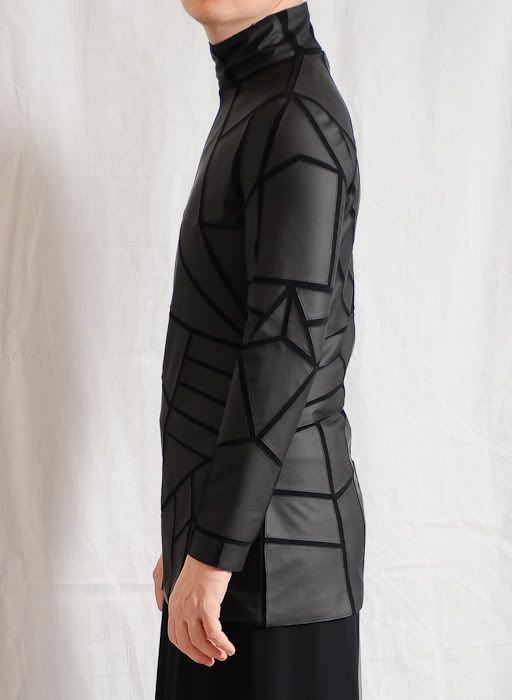
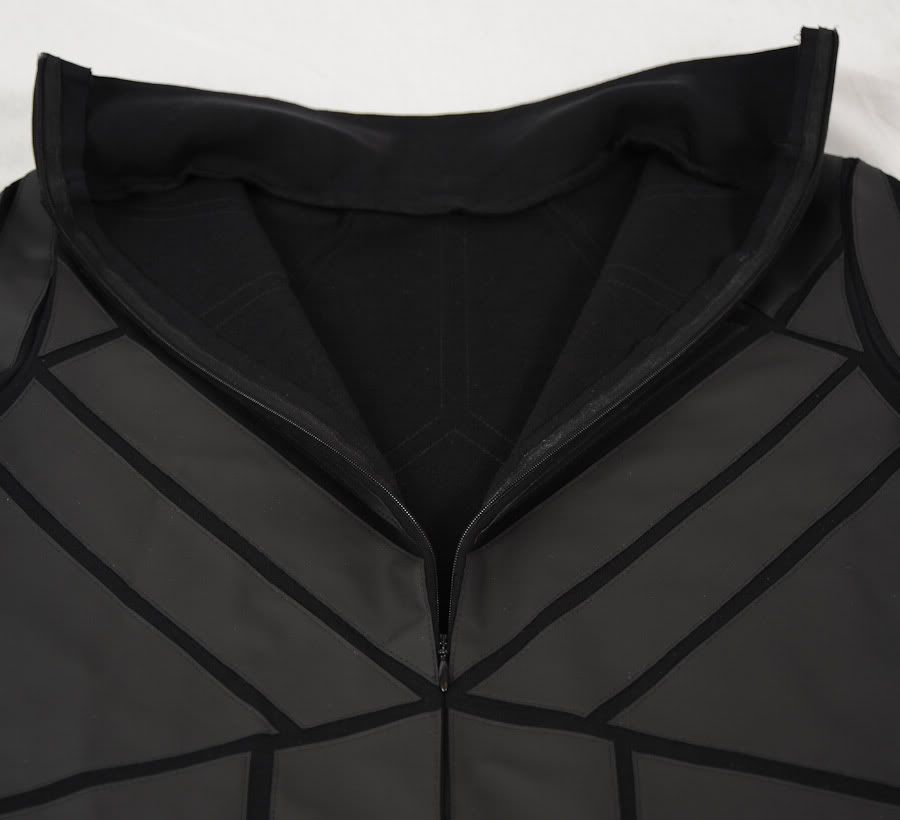
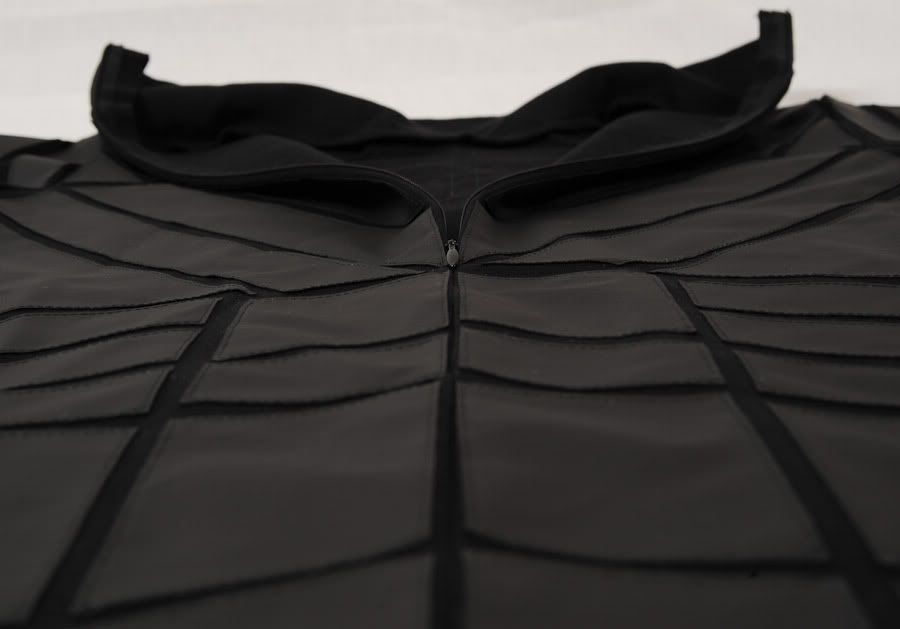
The dress doesn't have a zipper in front, but in the back (hidden).
Pattern
I didn't want to take the same pattern, but rather start from scratch to get it right this time. I downloaded a turtleneck pattern from Burda...

... which I modified quite heavily, changing the collar, making the sleeves a little wider at the fore arms to balance out the proportions, making it more narrow at the waist and letting it become wider again.
I wanted this pattern (especially due to the stretch of the jersey) to really be tight-fitting, with no puckering to appear.
I did a total of three draft versions (with the FINAL material to be used) to make sure the fit was ok.
Funny enough - the turtleneck pattern is less complicated than the jacket pattern I had used before. No darts, no two-piece sleeve, just 1 front, 1 back, 1 sleeve and 1 collar piece.
Geometric pattern
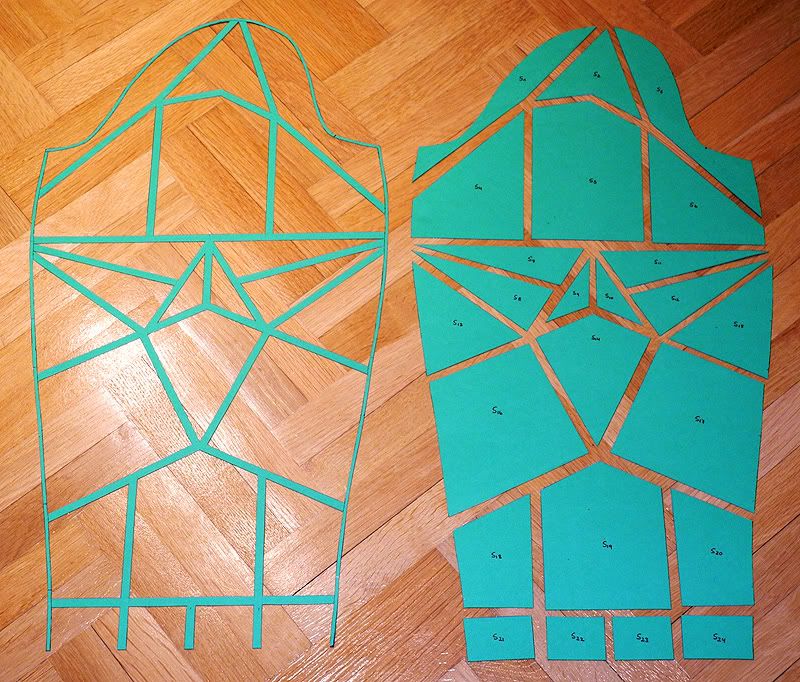
As the new pattern was much more narrow than the jacket, the geometric patterns didn't fit anymore. There are some minor things about the geometric pattern that I didn't like in version 1, so I changed these for version 2.
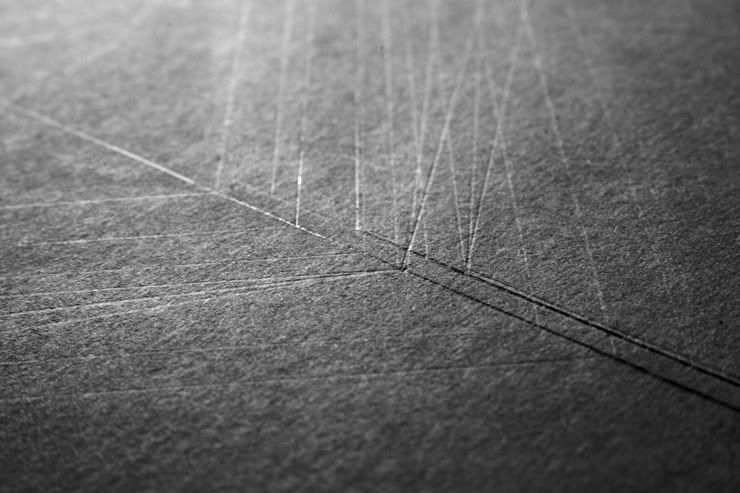
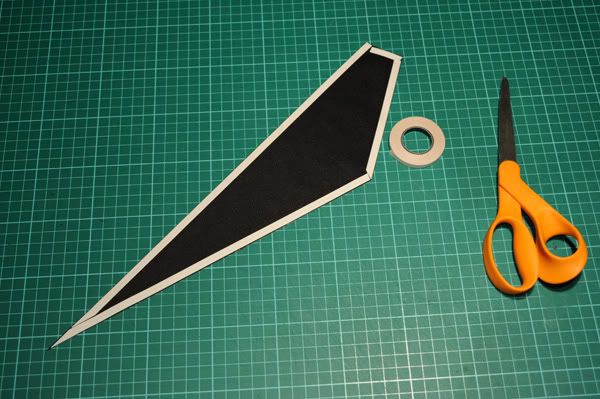
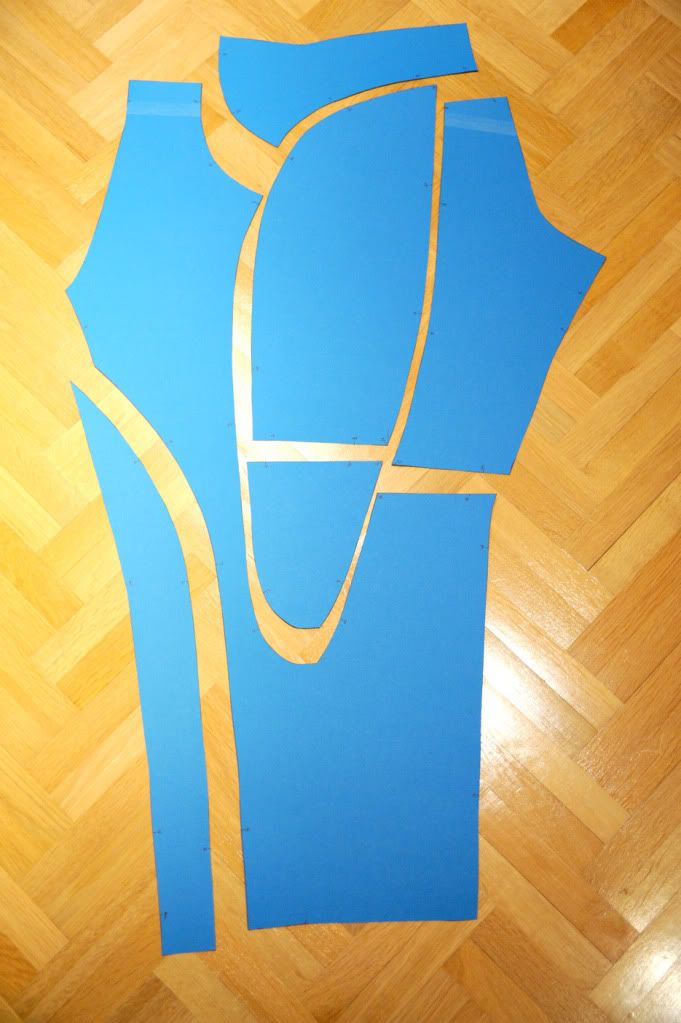
I always work with cardboard paper, a pencil, set square and an eraser if I find the geometry not to be perfect. As you can see in this picture, it was a lot of try and error (and erasing the pencil marks) to finally achieve the pattern I liked.
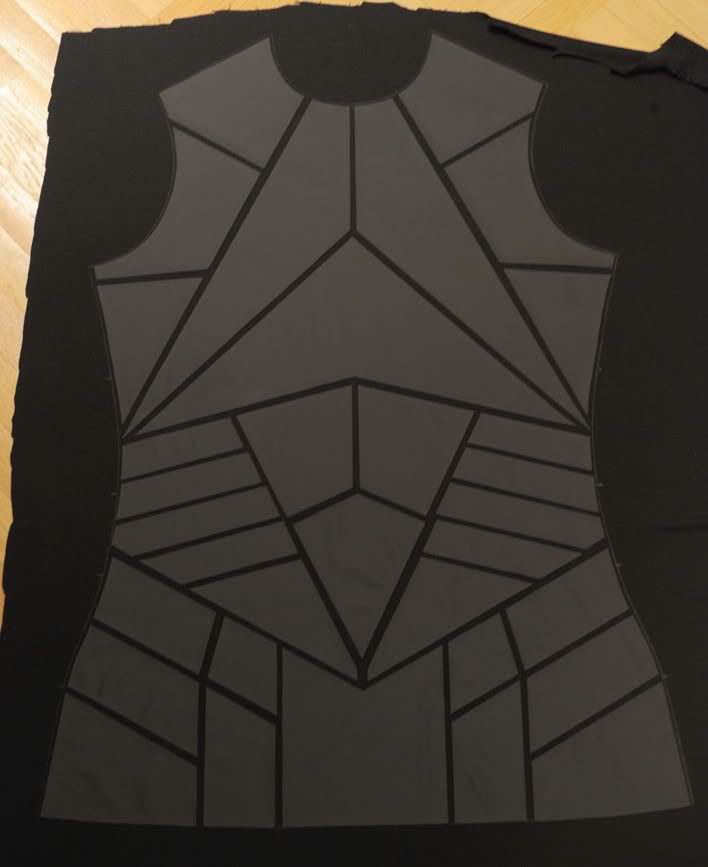
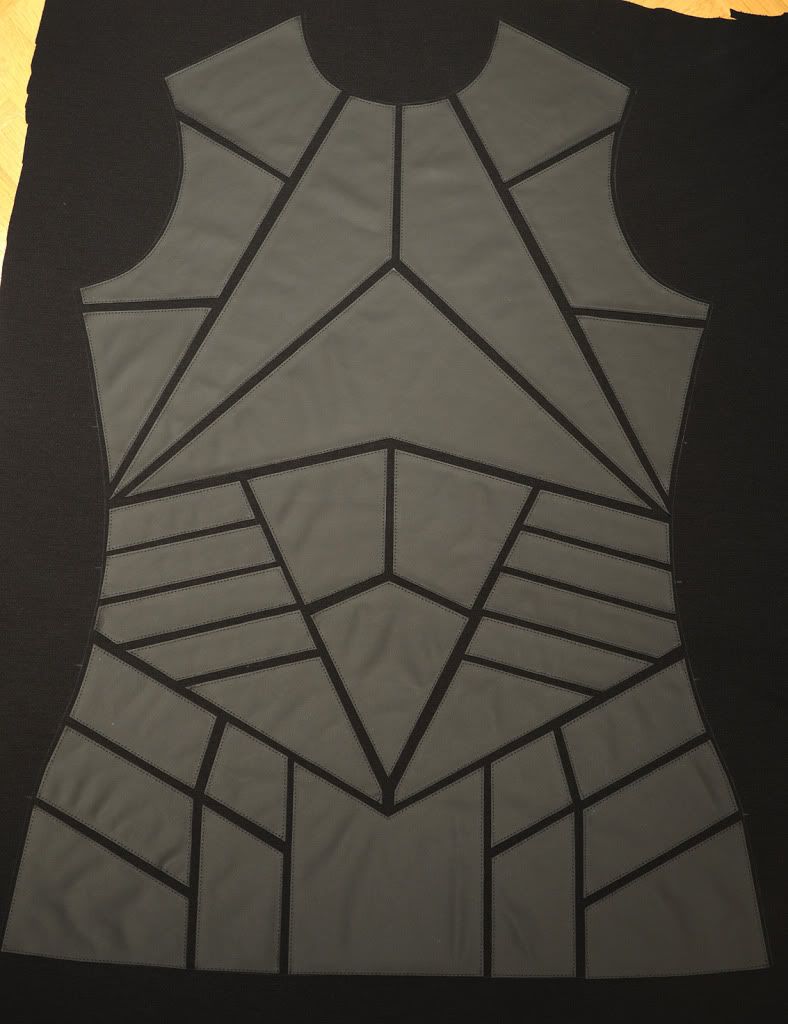
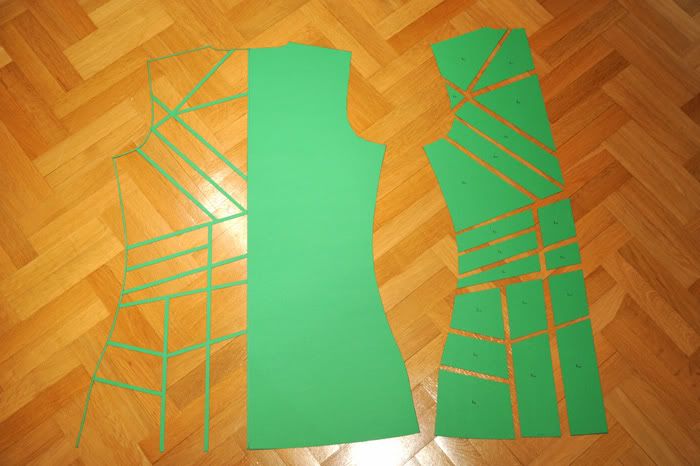
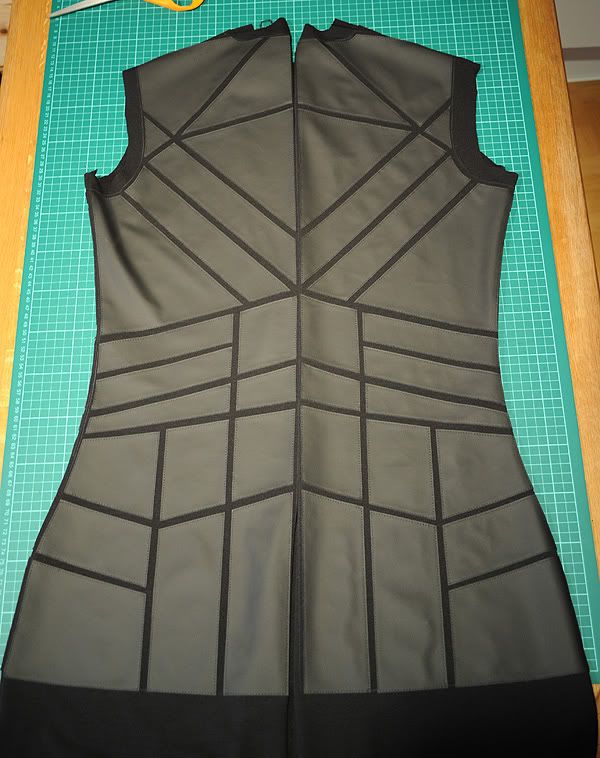
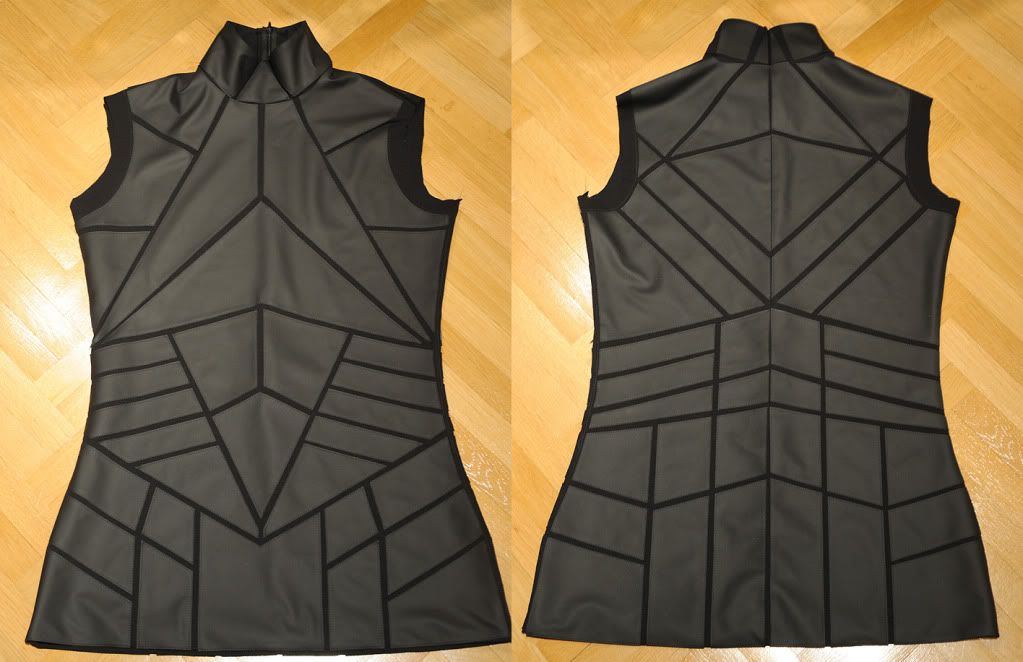
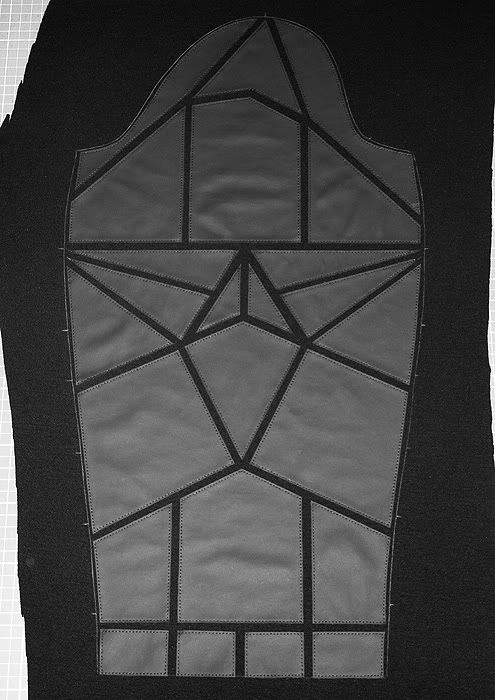
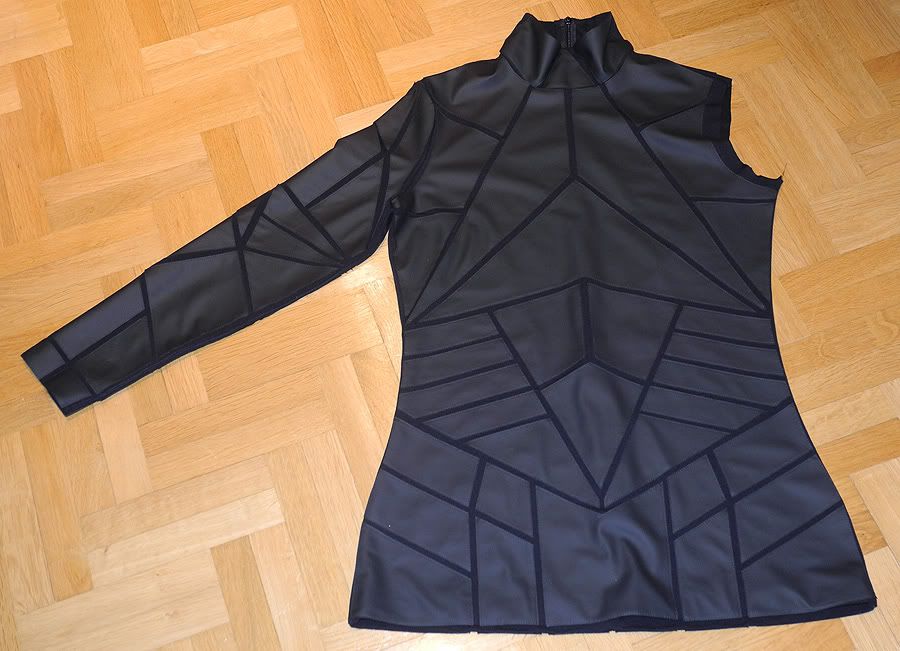
Nonetheless, I was much faster putting the pattern together as last time. Here are the front and the back pieces:
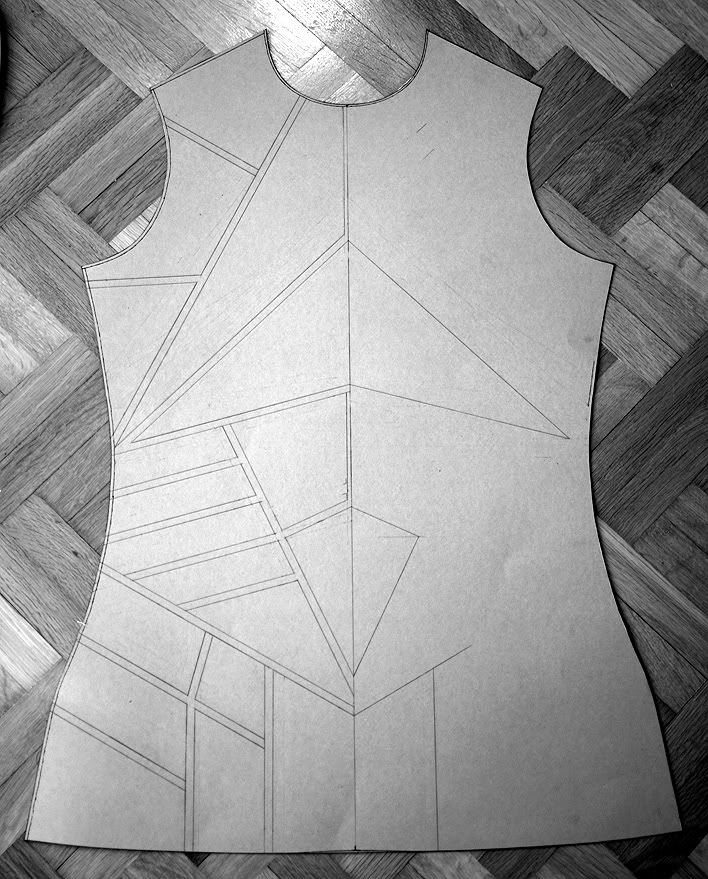
Front
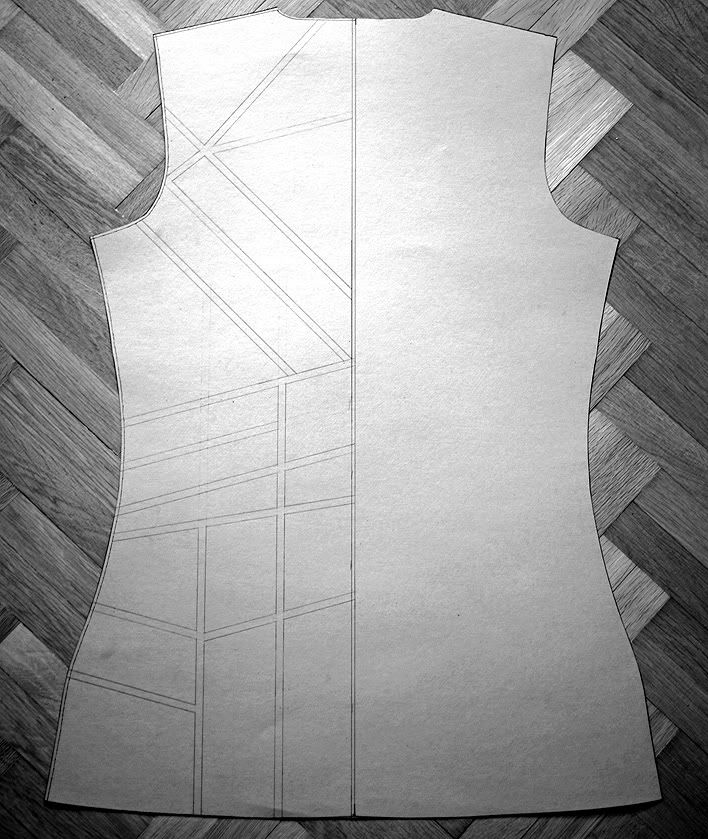
Back
That's the current status. Next will be labeling the pattern pieces, cutting them out, transferring them to the rubber and sewing them onto the jersey. I will keep you updated...
you already have seen the Gareth Pugh jacket that I did a few weeks ago. Although the result was great, I noticed that the materials I used were a bit too thick, so it turned out that the jacket was too warm when wearing it at a club. In addition, Heirloom had commented that the basic fit wasn't perfect, due to some puckering at the back and the sleeve being too wide at the top and too narrow at the fore arms -- I wholeheartedly agree to what he said. Problem was that I didn't use the Neoprene material for creating the pattern, and didn't know exactly how it would behave later, so I might have been too cautious, making things wider as they needed to be.
Apart from that, I used a leather/Neoprene combination, whereas Gareth had used jersey/PVC for his designs.
Fast forward a couple of weeks: While browsing a fabric online store, I stumbled upon a PVC/rubber material that matches the material Gareth used. 0,5 mm thickness - less than half of the leather I had used before. Absolutely matte (no reflection at all), black, with a textile back.
Hmm... should I order it? After all, I had done it before, so I could do it again, right?
All again, but yet different
Should I just redo the jacket with the zipper in front? Having two versions of the same basic design didn't appeal to me. That's why I decided to take the dress of his collection and shorten it a bit, so it would be more of a "long-shirt". There is also a version available with long sleeves, which I unfortunately didn't find a photo of, so I am posting the short-sleeved version here:
The dress doesn't have a zipper in front, but in the back (hidden).
Pattern
I didn't want to take the same pattern, but rather start from scratch to get it right this time. I downloaded a turtleneck pattern from Burda...
... which I modified quite heavily, changing the collar, making the sleeves a little wider at the fore arms to balance out the proportions, making it more narrow at the waist and letting it become wider again.
I wanted this pattern (especially due to the stretch of the jersey) to really be tight-fitting, with no puckering to appear.
I did a total of three draft versions (with the FINAL material to be used) to make sure the fit was ok.
Funny enough - the turtleneck pattern is less complicated than the jacket pattern I had used before. No darts, no two-piece sleeve, just 1 front, 1 back, 1 sleeve and 1 collar piece.
Geometric pattern
As the new pattern was much more narrow than the jacket, the geometric patterns didn't fit anymore. There are some minor things about the geometric pattern that I didn't like in version 1, so I changed these for version 2.
I always work with cardboard paper, a pencil, set square and an eraser if I find the geometry not to be perfect. As you can see in this picture, it was a lot of try and error (and erasing the pencil marks) to finally achieve the pattern I liked.
Nonetheless, I was much faster putting the pattern together as last time. Here are the front and the back pieces:
Front
Back
That's the current status. Next will be labeling the pattern pieces, cutting them out, transferring them to the rubber and sewing them onto the jersey. I will keep you updated...


Comment